
How to Create a Paid Discord Server (Step-by-Step Guide)
Want to monetize your community? Learn how to create a paid Discord server with our simple step-by-step guide. Start building your subscription business today!
Monetizing your Discord community is easier than you think.
The challenge?
Figuring out the best way to charge people for access.
Discord's new subscription feature is expensive. They charge a 10% fee on your earnings, plus payment processing fees. If you make $2,000, you automatically lose $200 to Discord.
That's exactly why successful community builders skip Discord's built-in monetization. Instead, they create a paid Discord server using external payment platforms that integrate through automation. This cuts platform fees dramatically and gives you full control over your business.
The complete setup takes about 30 minutes with the right tools. You'll connect a payment platform to Discord, automate member access, and handle everything from a single dashboard. No manual invite links. No spreadsheets.
This guide covers the complete setup using Outseta, which combines subscription billing, member authentication, CRM, and email into one platform. You'll see exactly how to structure your server, create membership tiers, process payments, and automate the member experience.
Setting Up a Paid Discord Server: Which Method Works Best
You have two ways to charge for Discord access. Either use Discord's built-in subscriptions or connect an external payment platform.
Discord's Native Server Subscriptions
Discord rolled out server subscriptions a few years ago, letting you charge members directly through their platform. Sounds convenient until you see the costs.
Discord takes 10% of every transaction. Add Stripe's standard 2.9% + $0.30 payment processing fee, and you're losing roughly 13% of revenue before you see a dollar. On $5,000 monthly revenue, that's $650 gone.
The features fall short too. Basic tier management, simple discord billing, and not much else. No integrated CRM. No email marketing. No detailed analytics. Discord locks you into their limited toolset.
External Payment Platforms (The Better Approach)
This approach connects a payment platform to Discord through automation. Members subscribe on your website. The system then automatically grants Discord access based on their subscription.
The economics are significantly better. External platforms like Outseta charge around 5% total (including payment processing) versus Discord's 13%. On $5,000 monthly revenue, you keep an extra $400.
You also get more control and flexibility. You can manage discord server subscriptions from a single dashboard, with better analytics, email automation, and customer management tools. The setup takes more effort upfront, but you end up with a system that scales.
Create a Paid Discord Server: Step-by-Step Guide
Step 1: Set Up Your Discord Server Structure
Before connecting any payment systems, organize your Discord server properly.
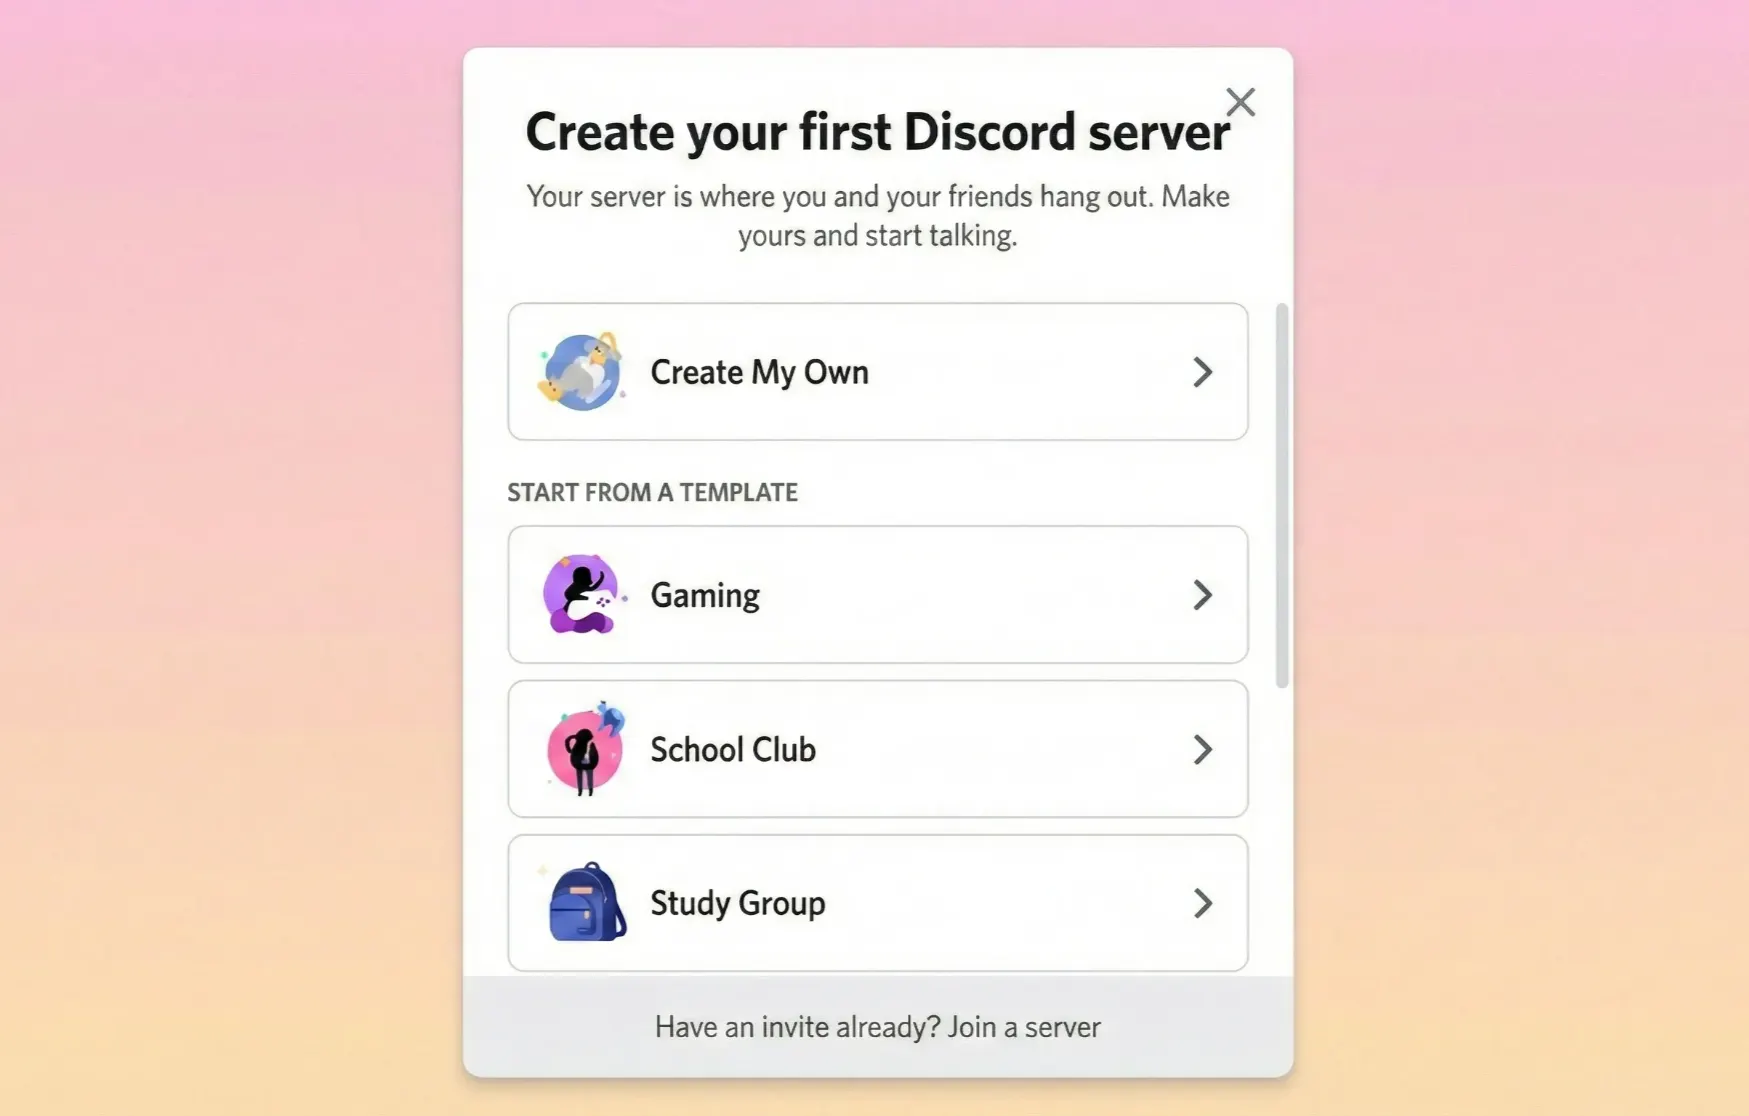
Create your server if you haven't already.
Open Discord, click the "+" icon, and select "Create My Own."
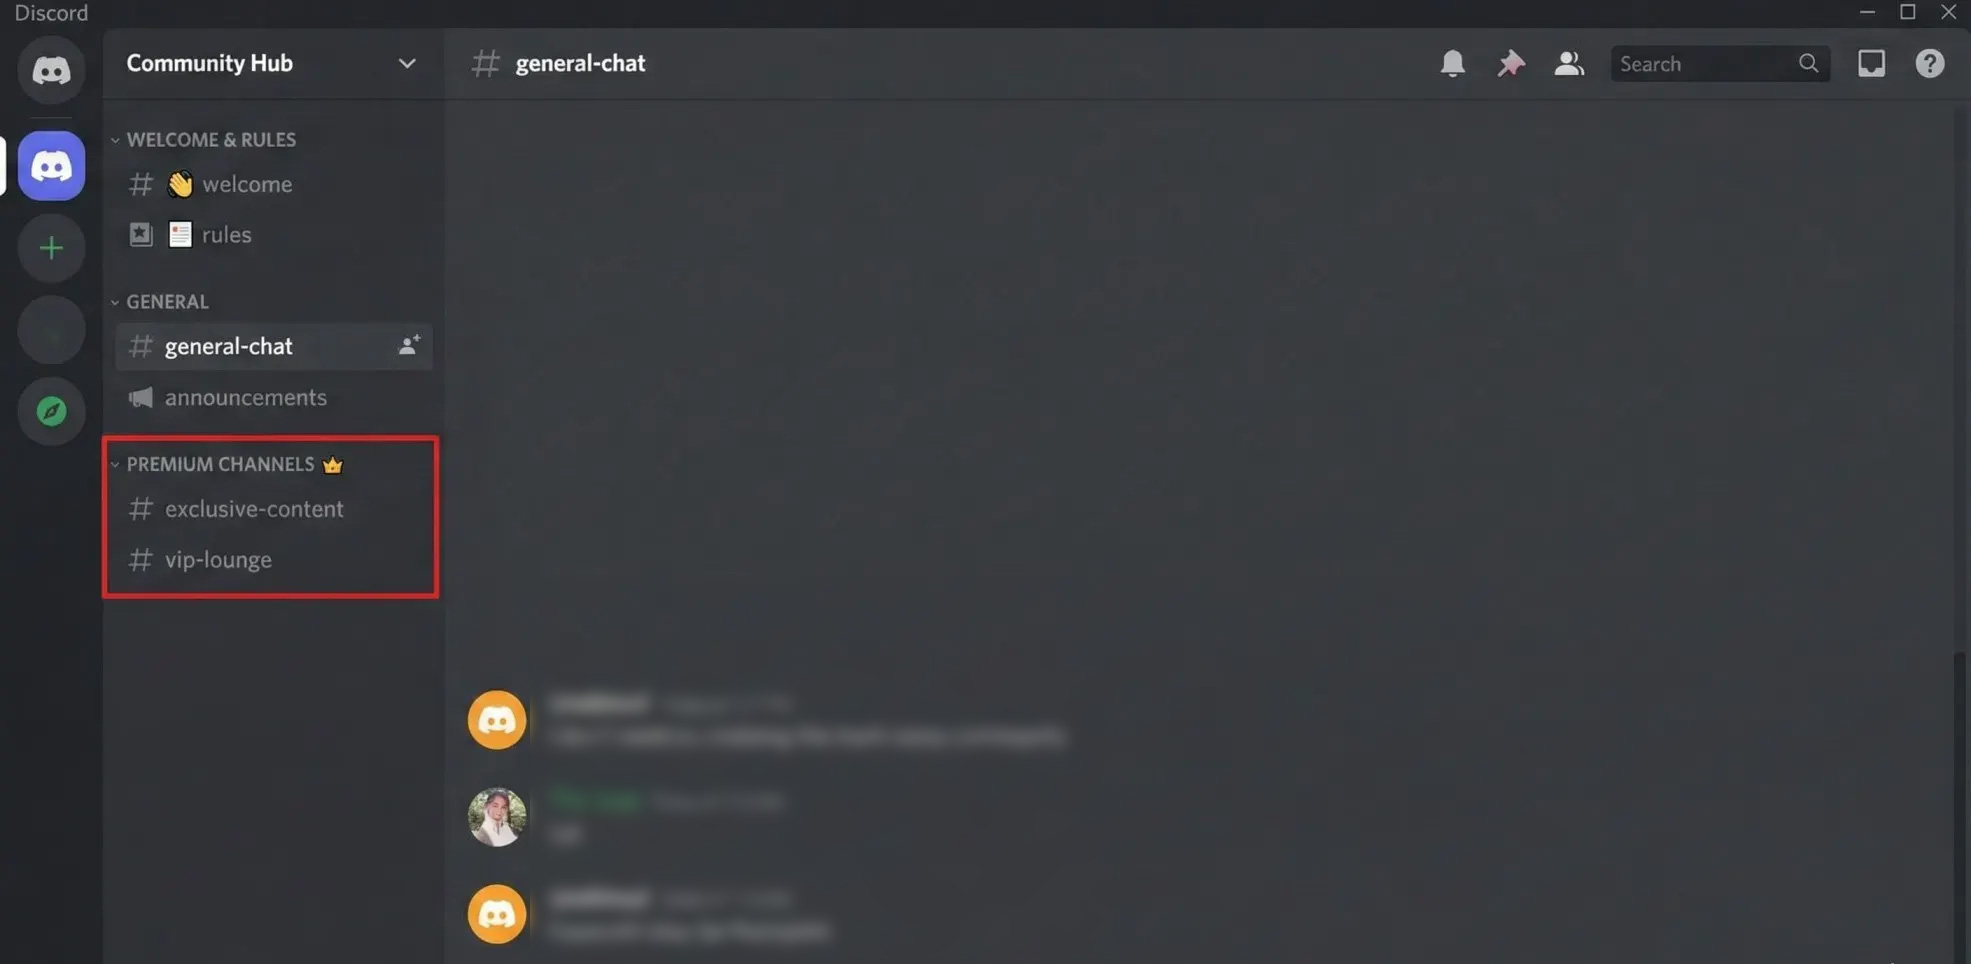
Set up categories and channels to organize your community:
- Welcome channel to greet new members
- Rules channel for community guidelines
- General discussion areas
- Premium-only channels for paid members
- Topic-specific channels based on your niche
Create membership roles. Go to Server Settings > Roles and create roles like Free Members, Basic Subscribers, and Premium Members. These roles determine channel access for each member.
Make your server invite-only. Go to Server Settings > Roles, select the @everyone role, and turn off the "Create Invite" permission. This keeps your community exclusive - only people with your invite link can join.
Generate a permanent invite link. Click your server name dropdown, select "Invite People," edit the link, and set it to "Never Expire." Save this link for your welcome emails.
Your Discord server is ready for monetization.
Step 2: Set Up Outseta and Connect Stripe
You need a membership mamangement platform to handle payments and automate Discord member access.
Sign up for Outseta at Outseta.com and create a free account. You'll get a 7-day trial with access to all features.
Once logged in, go to Billing > Settings in your Outseta dashboard and click the Connect to Stripe button. You can either sign in to your existing Stripe account or create a new one during this process. Follow the prompts to authorize the connection and select your preferred currency for charging customers.
.webp)
After connecting successfully, you'll see your account is in Manual mode by default. This protects you from accidental charges during setup. Switch to Automatic mode to automatically collect payments when members sign up. You can also enable "Send invoice payment email" if you want customers to receive payment confirmations.
.webp)
Click Save to complete the setup. You're now ready to accept discord payments for your community and can move on to connecting Outseta to your Discord server.
{{cta}}
Step 3: Install and Configure Outseta's Discord Bot
The Outseta Discord Bot automates member access by managing roles and removing members when subscriptions end.
In your Outseta dashboard, go to Settings > Integrations > Discord and click Connect to Server.
.webp)
Select your Discord server from the dropdown and click Continue. If you don't see your server, sign out of Discord, sign back in as an admin, and try again.
.webp)
On the authorization screen, click Authorize to grant Outseta permission to manage your server.
.webp)
Critical step: You must position the bot's role correctly.
Go to Discord Server Settings > Roles. Drag the Outseta bot role above all member roles (Basic Members, Premium Members, etc.). The bot can only manage roles below it in the hierarchy. This is the most common setup mistake.
.webp)
Verify the bot has permissions for Manage Roles, Create Instant Invite, and Kick Members.
Your Discord server is now connected and ready for discord membership management.
Step 4: Create Membership Plans in Outseta
Now you'll create the membership plans that determine pricing and access levels for your community.
In your Outseta dashboard, navigate to Settings > Billing > Plans and click Add Plan to create your first membership tier.
.webp)
Configure your plan details. Add a plan name that members will see (like "Basic Member" or "Premium Access"), set your pricing amount, and choose the billing frequency. You can offer monthly, annual, or both options. Consider adding a trial period to let potential members test your community before committing.
Add a clear plan description explaining member benefits. This shows up during checkout and helps convince people to subscribe.
Set up additional tiers if you want multiple membership levels. Many successful discord memberships offer 2-3 tiers with increasing benefits. For example, a Basic tier at $10/month, a Pro tier at $25/month, and a VIP tier at $50/month.
Configure your billing settings including proration handling, cancellation policies, and whether you want to collect payment information during or after free trials.
Save each plan. You'll map these plans to Discord roles in the next step.
Step 5: Map Membership Plans to Discord Roles
Now you'll connect your Outseta membership plans to specific Discord roles so members automatically get the right access level.
Back in Settings > Integrations > Discord, you'll see your connected server. Click on it to open the mapping settings.
For each membership plan you created, select the corresponding Discord role from the dropdown menu. For example, map your "Free" plan to @everyone in Discord and your "Pro Member" plan to the Pro Members role. This tells Outseta which role to assign when someone subscribes to each plan.
.webp)
Configure your automation settings. Check "Remove members from Discord if their subscription expires" if you want to automatically remove members when their subscription reaches Trial Expired or Expired status. This keeps your community exclusive to paying members.
Most users leave the "Suppress prompting all users to connect to Discord when they login" option unchecked. When unchecked, Outseta automatically prompts members to connect their Discord account after signing up, creating a seamless experience.
Click Save to finalize your discord server subscriptions setup. Members who subscribe will now automatically receive their appropriate Discord role and access.
Step 6: Set Up Member Sign-Up Flow
For the final step, configure how new members join your paid discord community after they subscribe.
Outseta automatically sends a confirmation email when someone signs up, prompting them to set a password.
.webp)
Add your Discord invite link to the welcome email by going to Settings > Email > Notification Emails, selecting "Add Welcome Email per Plan," and including the invite link.
Configure where members land after connecting Discord. Go to Auth > Sign Up and Login in Outseta and set your POST LOGIN URL. Outseta redirects members here after they authorize Discord access.
Here's the member journey: They receive a confirmation email and set their password.
.webp)
Once set, they're redirected to Discord where they either log in or create an account by clicking Register.
.webp)
Discord then prompts them to authorize Outseta access by clicking Authorize.
.webp)
This connects their Outseta and Discord accounts. After authorization, Outseta automatically assigns their role based on subscription level and redirects them to your POST LOGIN URL.
Test the complete flow with a test subscription to ensure everything works.
Your paid Discord server is now fully automated and ready to accept members.
Growing Your Paid Discord Community
Strategic promotion and consistent value delivery help you attract members to your paid discord community.
Attract New Members
Create content that demonstrates your expertise on platforms where your audience already hangs out. Share valuable insights on YouTube, X (Twitter), or LinkedIn that naturally lead people to want more from you. Offer a free tier or limited-time trial to let potential members experience your community before committing. Create urgency by launching with founding member pricing that rewards early adopters.
Keep Members Engaged
The real revenue comes from keeping members long-term. Deliver consistent value through regular exclusive content, live Q&A sessions, or member-only resources. Stay active in your community daily so members feel connected to you. Create opportunities for members to connect with each other, not just with you. The strongest communities form around shared goals and peer relationships.
Scale Your Revenue
Start with a single membership tier and add premium options once you understand what members value most. Consider offering annual plans with a discount to improve cash flow and reduce churn. Bundle complementary products like courses or coaching calls with higher tiers. Track which channels get the most engagement and create more content in those areas.
Growing a paid community takes time, but you'll find monetizing discord server easier as you build reputation and deliver consistent results for members.
Conclusion
Setting up a paid Discord server doesn't require complex integrations or technical expertise. With the right platform, you can automate the entire process from signup to role assignment.
Key Takeaways:
- Discord's native subscriptions cost 13% in fees compared to 4-5% with external platforms
- Outseta automates member access, billing, and role management in one platform
- The complete setup takes about 30 minutes once you have your server ready
- Proper bot role positioning is critical for automation to work correctly
- Growing a paid community requires consistent value delivery and engagement
Ready to Monetize Your Discord Community?
Outseta gives you everything needed to run a membership business: subscription billing, member authentication, CRM, email marketing, and Discord automation. No juggling multiple tools or paying extra billing platform fees.
Start your 7-day free trial with full access to all features. No credit card required.
Start your free trial → Outseta.com
Your paid Discord server can be live and accepting members today.
Try Outseta free for 7 days—you'll have access to every feature. Cancel any time.

On this page
Get our newsletter