
How to use WeWeb’s Token Auth Plugin with Outseta
TLDR: This guide will teach you to use WeWeb’s Token Auth Plugin with Outseta. This allows you to use Outseta sign up and login embeds, while WeWeb recognizes the authentication state of the user.
- Users log in using Outseta's login embed
- Outseta redirects the user back to your WeWeb app
- WeWeb takes ownership of authentication state from here
Please not that you won't be able to test this before publishing your WeWeb app, as custom code in WeWeb is only added to published sites.
To follow along with this guide, you’ll need an Outseta account and a publishable (paid) WeWeb project. Having some experience with both WeWeb and Outseta helps—this guide does not cover that basics of either platform.
Setup
Add the Outseta Script
Let’s begin by adding the Outseta script to your project.
Copy/paste the script below into Settings> Custom code in WeWeb, replacing demo.outseta.com with your Outseta domain (found at Settings > General in Outseta).
<script>
  var o_options = {
    "domain": "demo.outseta.com",
    "load": "auth"
  };
</script>
<script src="https://cdn.outseta.com/outseta.min.js"
	data-options="o_options">
</script>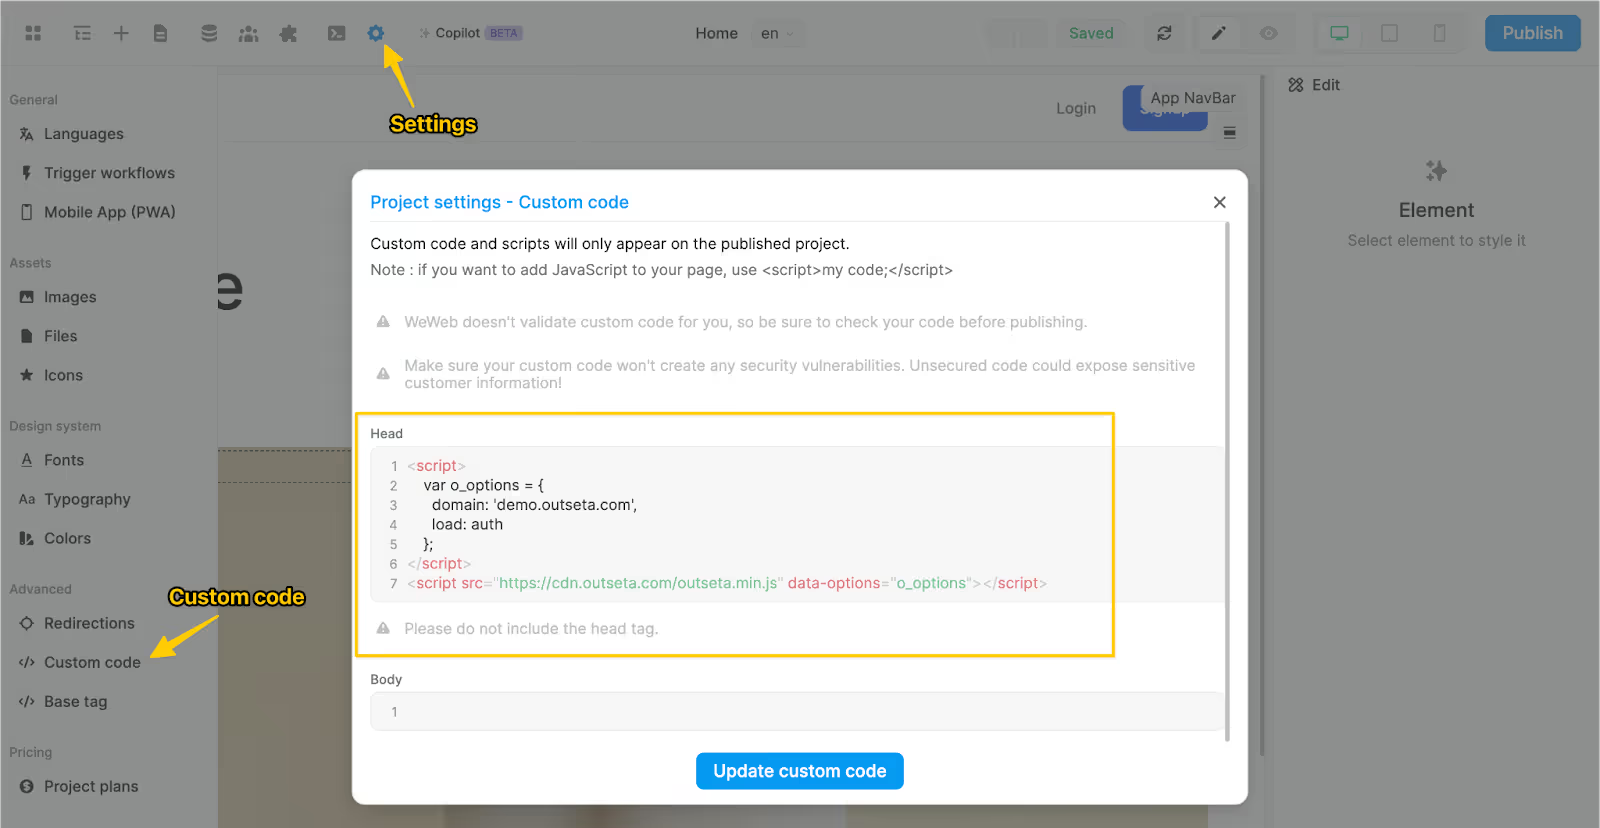
Add the WeWeb Token Auth Plugin
Next, add and configure the WeWeb Token Auth Plugin via Plugins > Authentication > Token Based Auth > Edit Configuration.
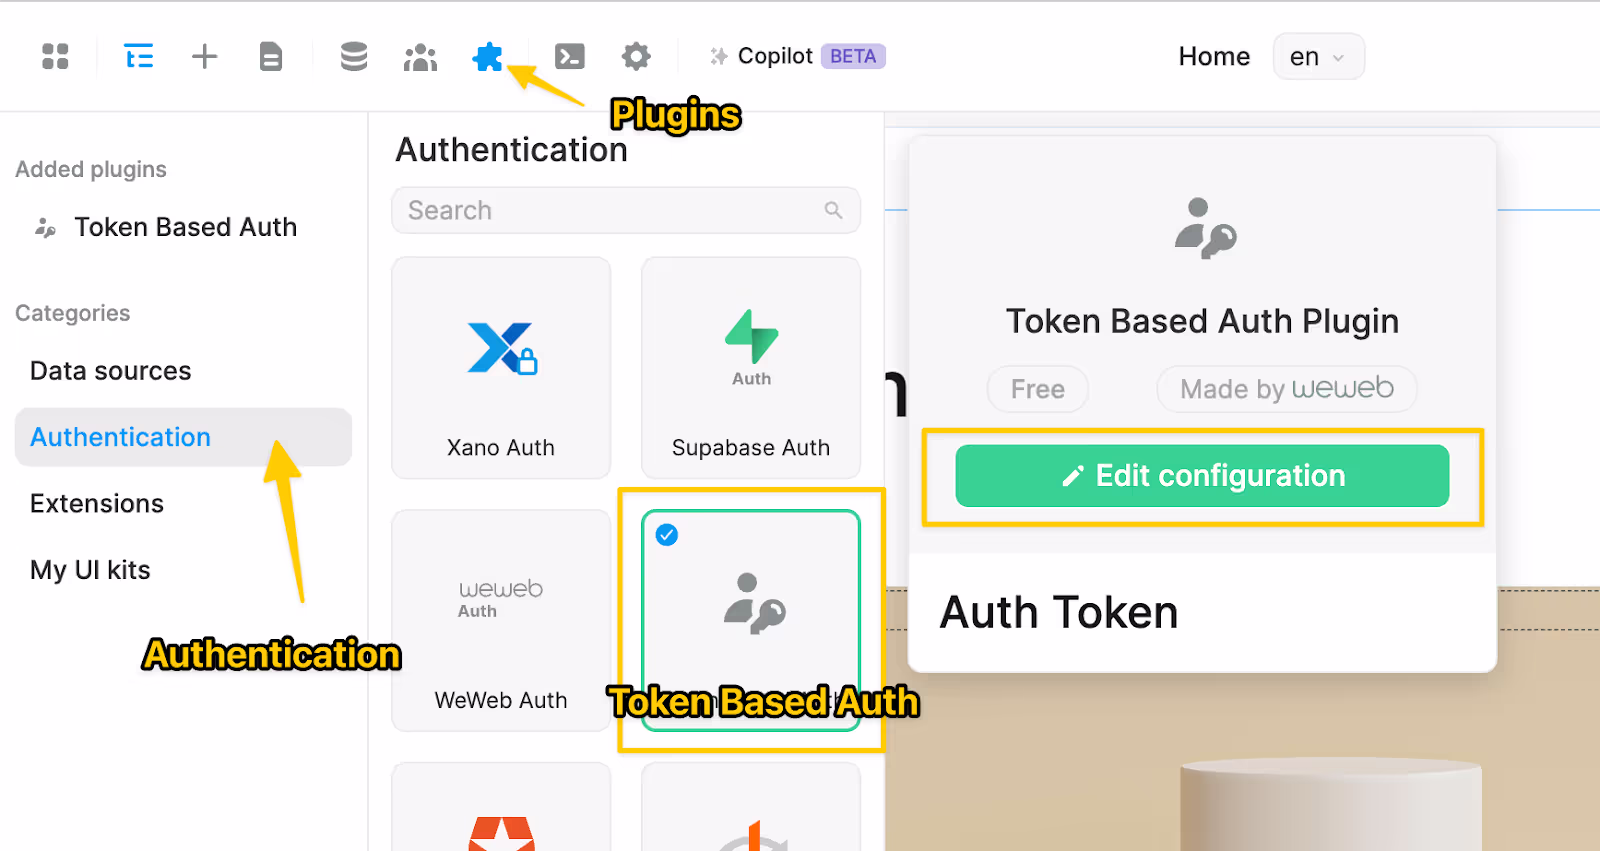
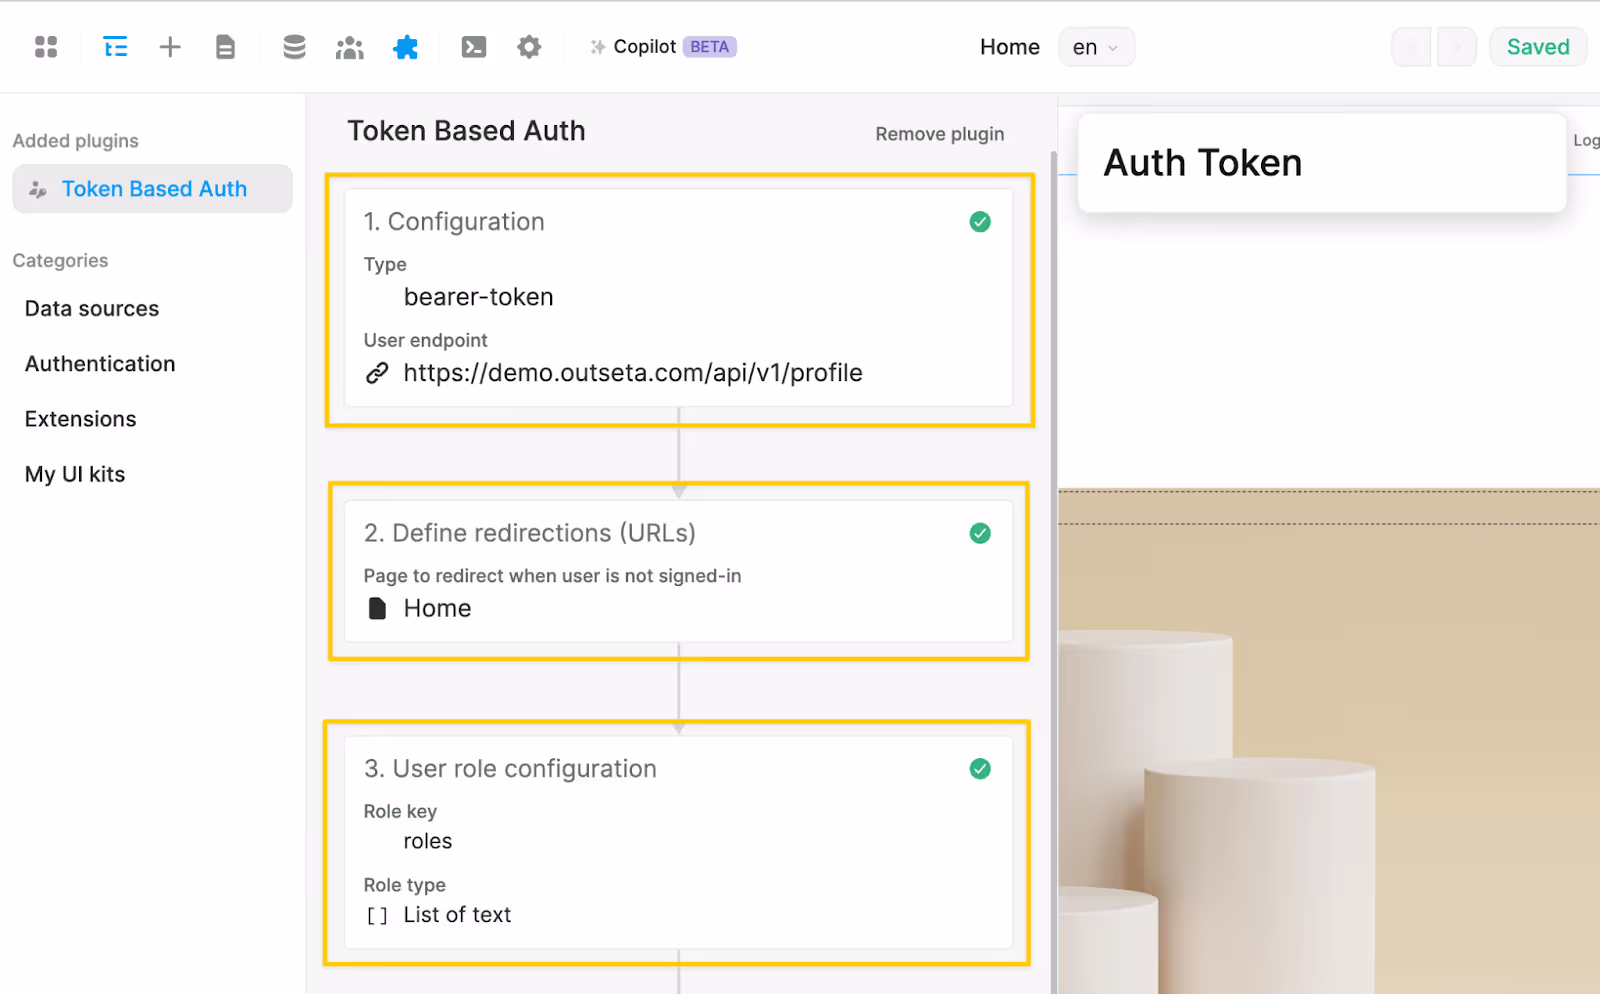
You’ll again need to replace demo.outseta.com with your Outseta domain (found at Settings > General in Outseta) in the User endpoint: https://demo.outseta.com/api/v1/profile.
Outseta has no refresh endpoint, so you’ll keep that empty. Outseta also does not support roles through the user/profile endpoint, so we’ll add the dummy value of "roles" and "List of text." We are, however, working on a solution that will let you use active plans and add-on access as roles here.
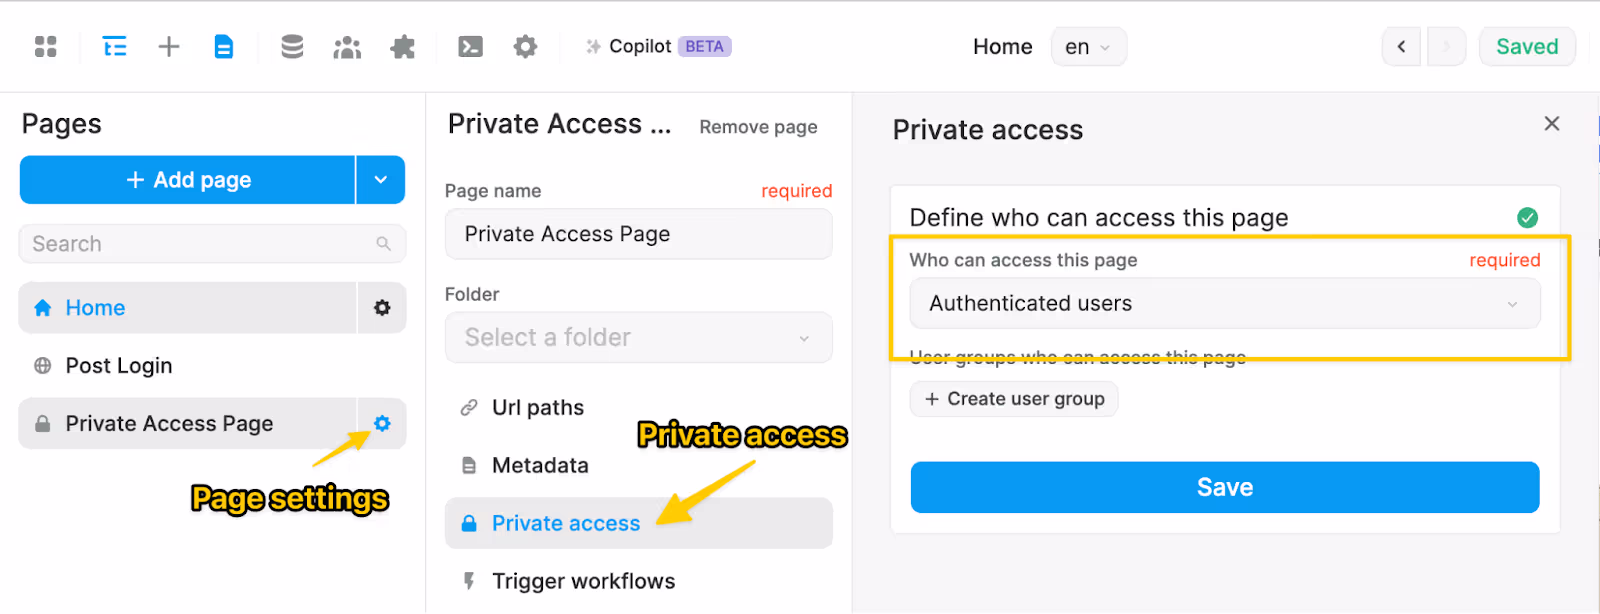
Configure Private Access Page(s)
Make one or more existing pages private access only, or create a new page.
- Limit access to authenticated users only: Page settings > Private Access
- Select “Authenticated users only” for “Who can access this page”
Create workflows
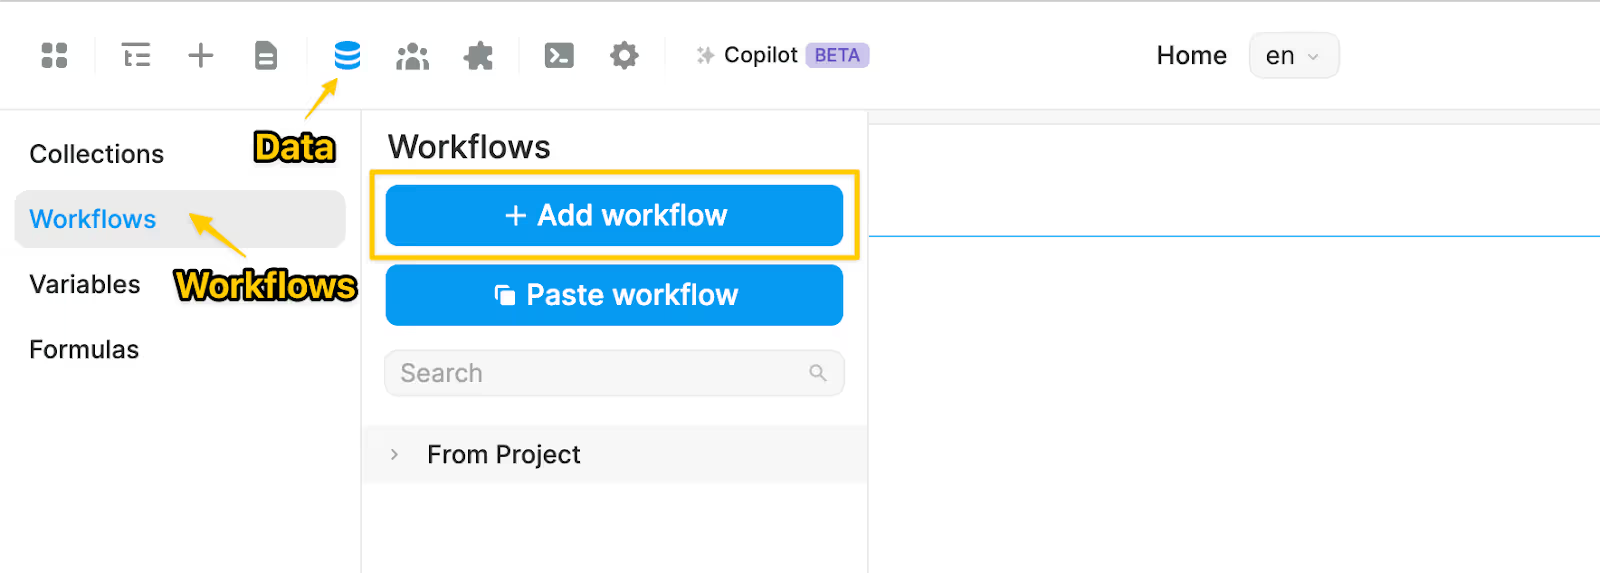
To make the WeWeb Token Auth Plugin and Outseta Embeds work together, we create four global workflows: Register, Login, Logout, and Save Token.
To create a global workflow, navigate to Data > Workflows > Add Workflow in WeWeb.
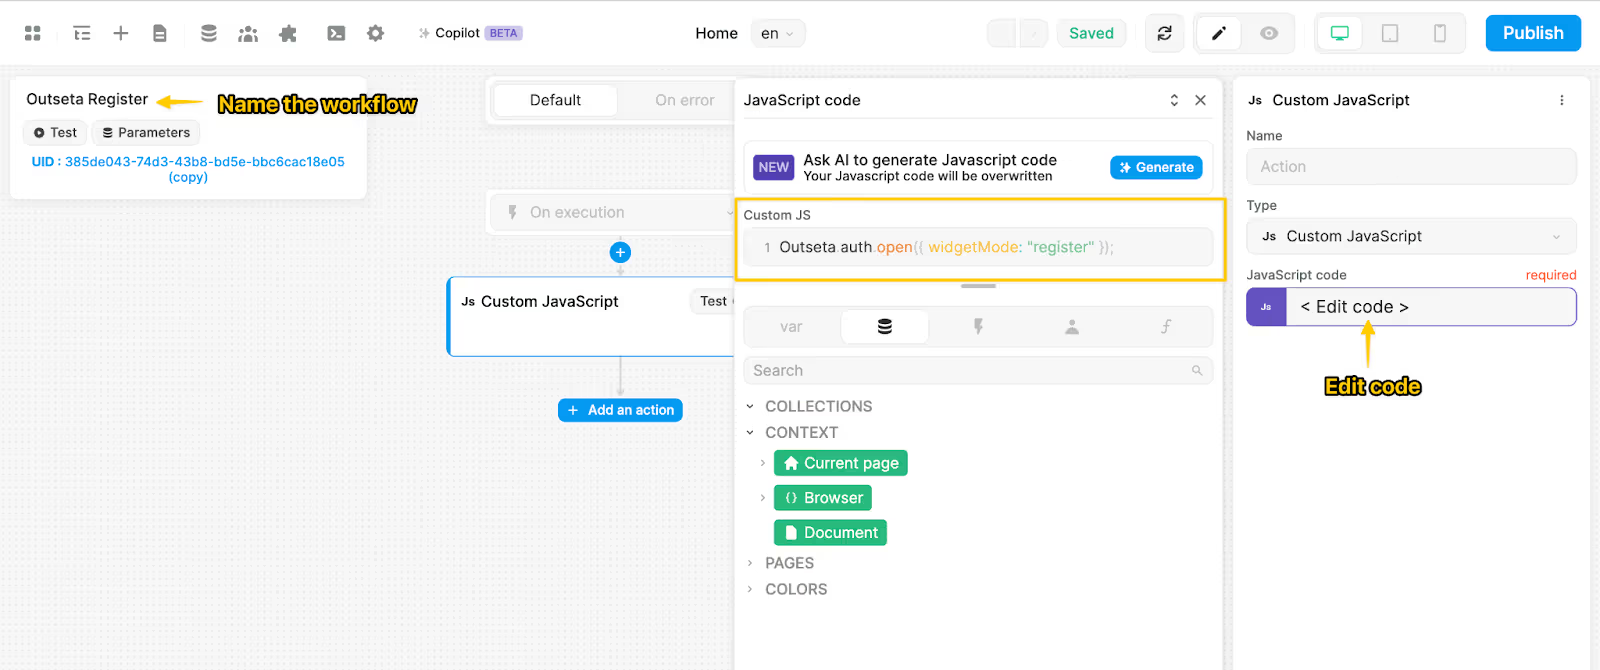
Register Workflow
This workflow is responsible for opening Outseta's sign up embed.
- Add a new global workflow: Data> Workflows > Add Workflow
- Add a custom code action and configure: Add action > Custom Javascript Script > Edit code
- Copy/paste the snippet below into the Custom JS field
Outseta.auth.open({ widgetMode: "register" });
Remember to name the workflow something memorable; we recommend “Outseta Register”.
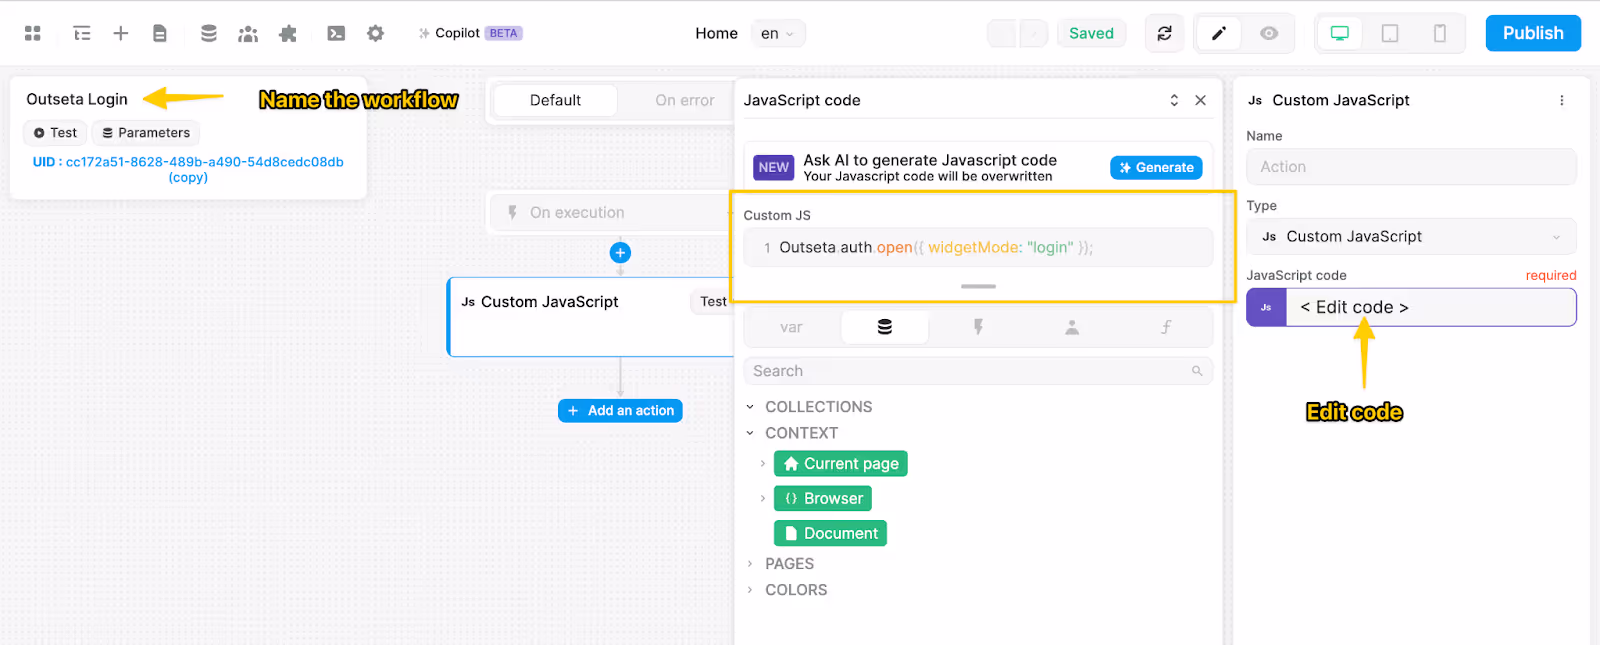
Login Workflow
This workflow is responsible for opening Outseta's login embed.
- Add a new global workflow: Data> Workflows > Add Workflow
- Add a custom code action and configure: Add action > Custom Javascript Script > Edit code
- Copy/paste the snippet below into the Custom JS field
Outseta.auth.open({ widgetMode: "login" });
Remember to name the workflow something memorable; we recommend “Outseta Login”.
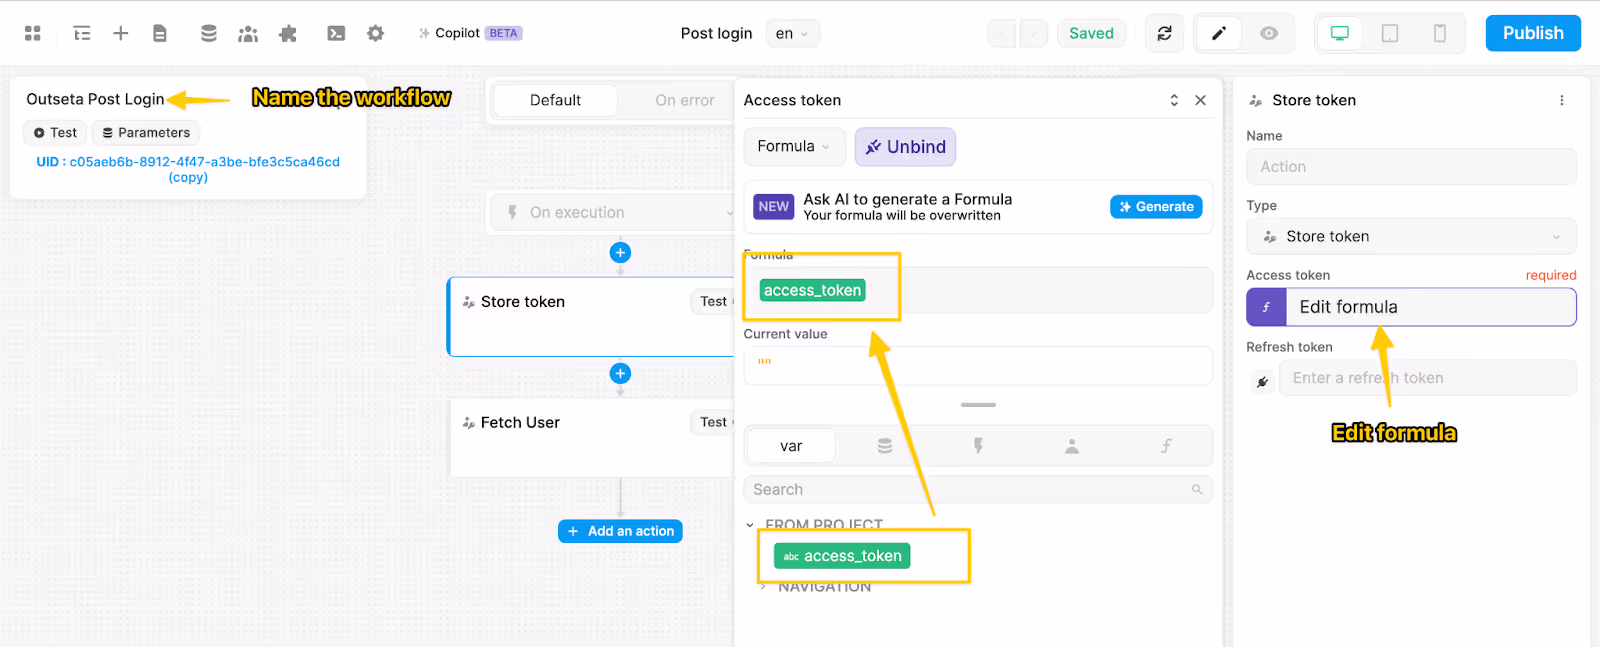
Save Token Workflow
Responsible for taking the Outseta access token found in the URL as a search param named access_token and saving it to the WeWeb Token Auth Plugin accessToken variable.
First, we’ll need a global variable to hold the search param access token access_token from Outseta.
- Add a new variable: Data > Variable > Add Variable
- Configure as seen in the screenshot below: Name => access_token and Type => Query.
- Default Value is allowed to be empty, even if the UI says required.

Secondly, we’ll need a global workflow that uses the access_token variable from above and saves it to the WeWeb Token Auth Plugin accessToken variable.
- Add a new global workflow: Data > Workflows > Add Workflow
- Add the “Store token” action and configure: Add action > Store Token > Edit formula
- For the formula, select access_token from the variables list.
- Add the “Fetch User” action: Add action > Fetch User
Remember to name the workflow something memorable; we recommend “Outseta Post Login”.
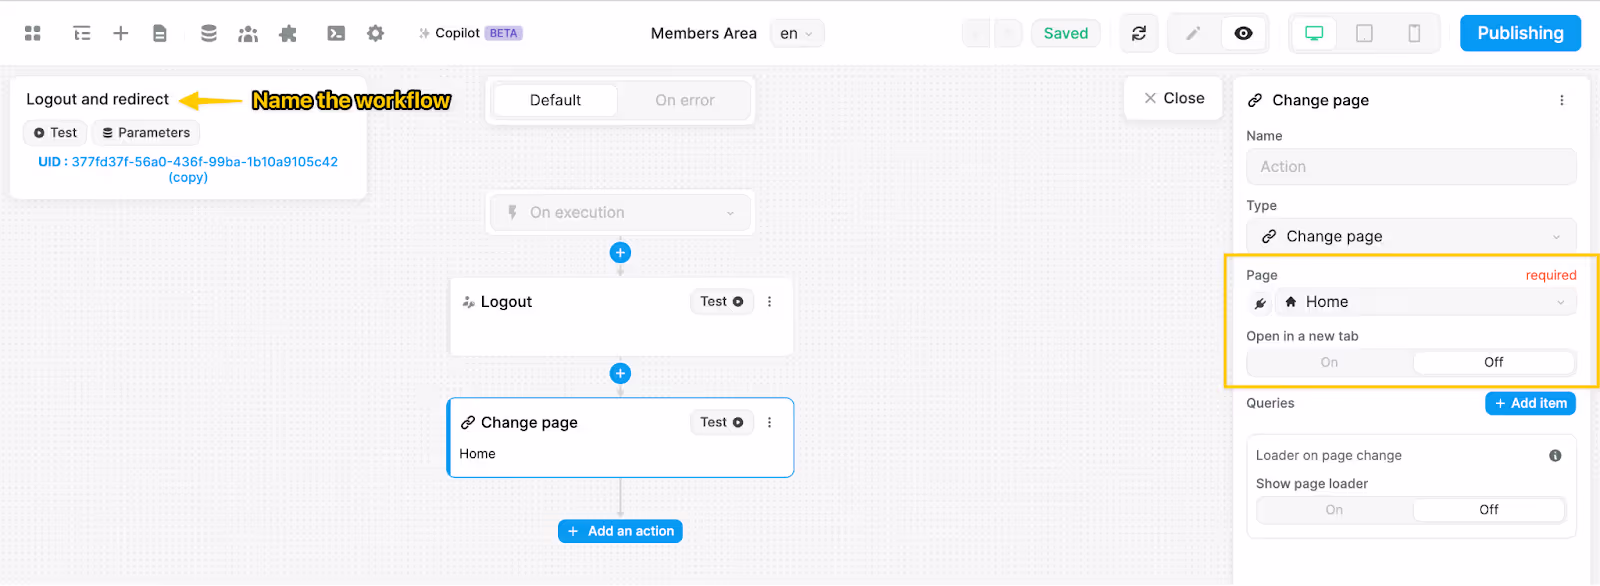
Logout Workflow
This workflow is responsible for forgetting the token stored in the WeWeb Token Auth Plugin accessToken variable and reloading the page to make the WeWeb private page logic take effect.
- Add a new global workflow: Data > Workflows > Add Workflow
- Add the “Logout” action: Add action > Logout
- Add a “Change page” action and configure: Add action > Change page
- Configure a page to redirect to, as seen in the screen below.
Remember to name the workflow something memorable; we recommend “Logout and reload”.
Add auth buttons
Now that you have all the workflows configured let’s put them to good use.
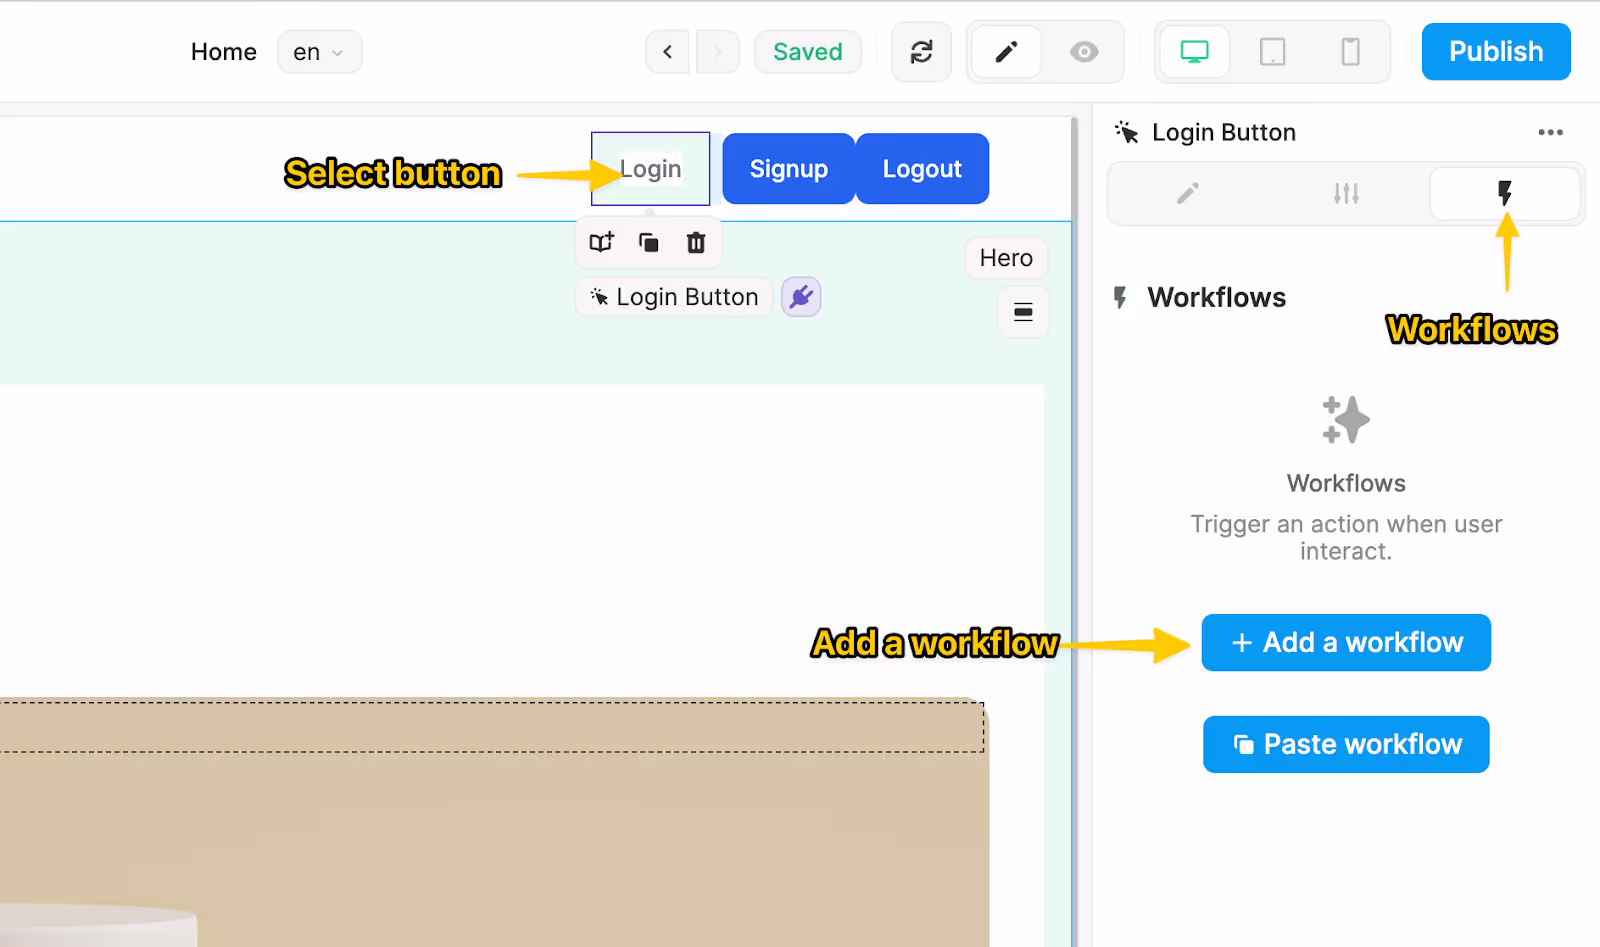
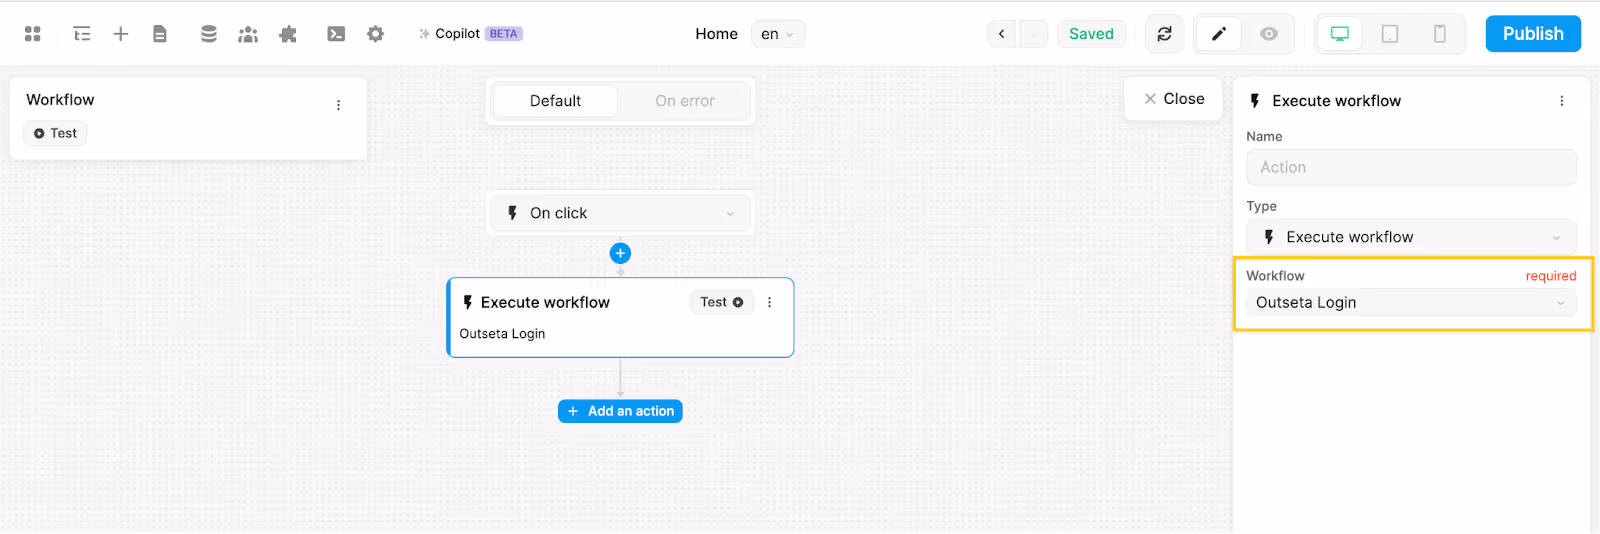
Add Signup, Login, and Logout button where it makes sense in your app, typically in an App Navbar, and then for each button:
- Add a workflow to the button: Select button > Workflows > Add a workflow
- Add the “Execute workflow” action and configure: Add action > Execute workflow
- Select the global workflow corresponding to the button: “Outseta Login” for the Login button, “Outseta Register” for the Signup button, and “Outseta Logout” for the Logout button.
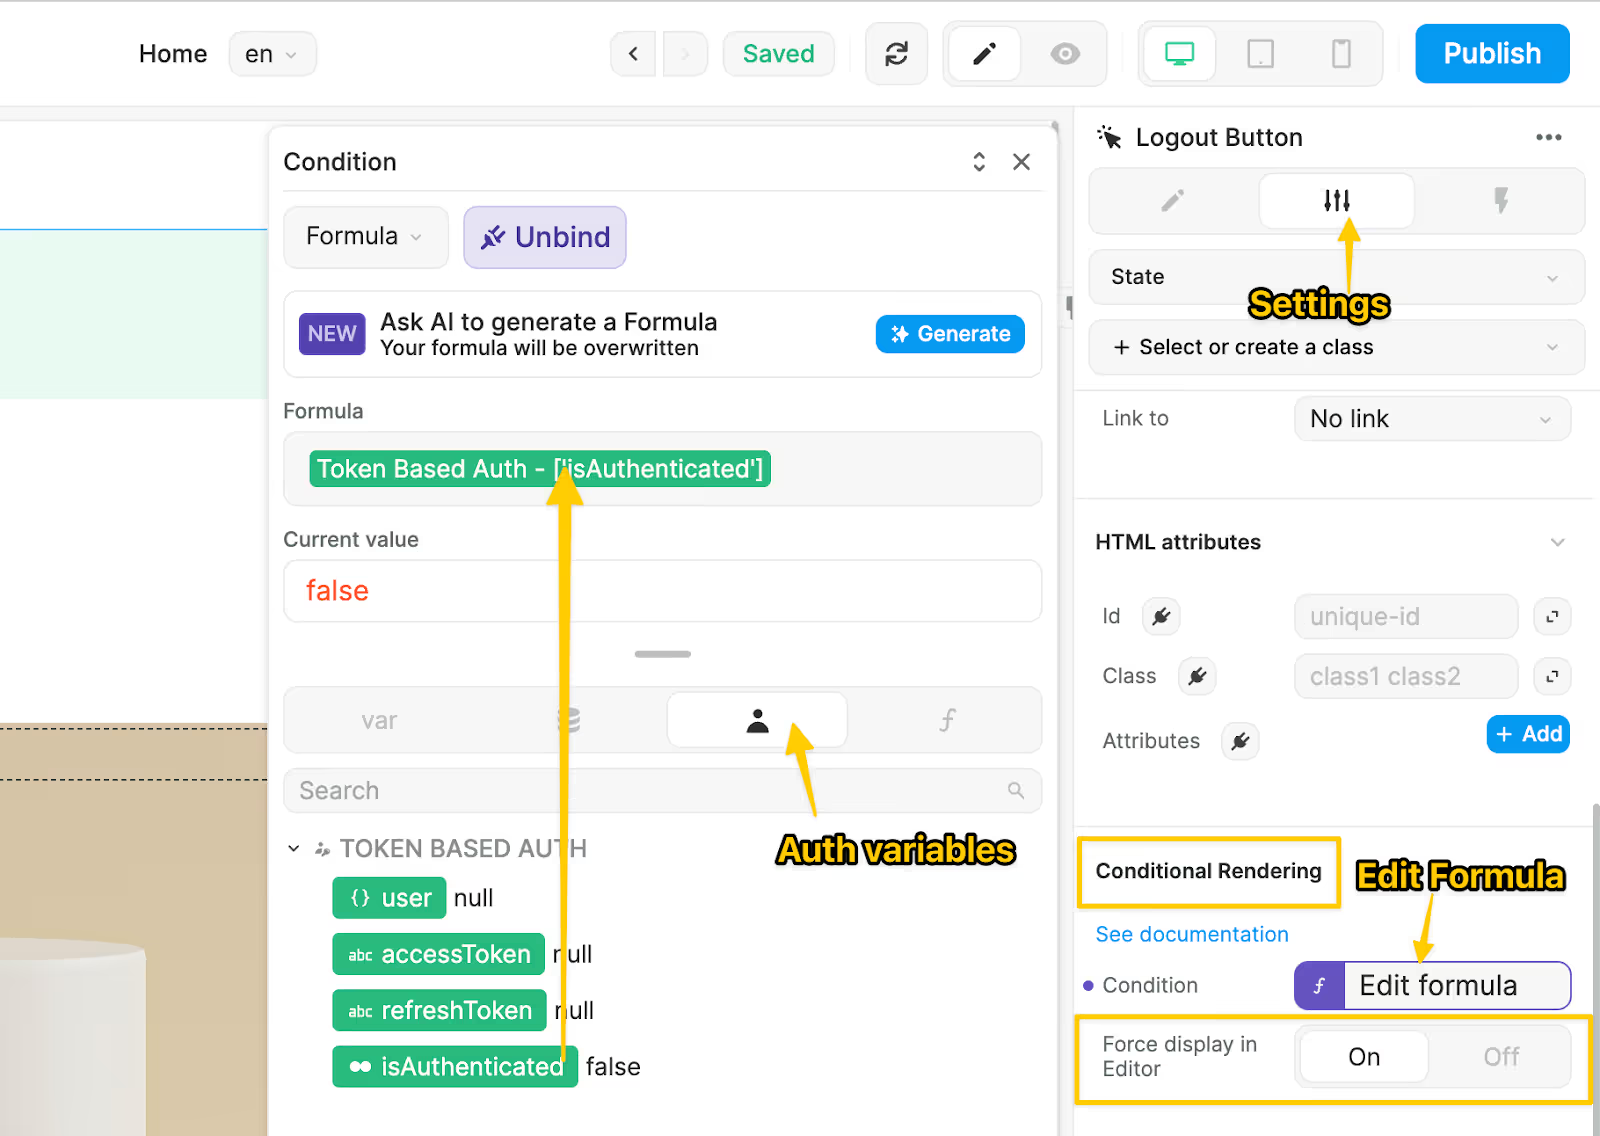
- You'll also want to show or hide these buttons based on the auth state of the user. Select button > Settings > Conditional Rendering
- Configure Logout to render only when the user is authenticated by adding the isAuthenticated variable from the Auth variables. If you want it to show in the editor even when isAuthenticated is false, configure “Force display in Editor” => “On”.\
- Configure Login and Signup to render only when the user is not authenticated by adding the isAuthenticated variable from the Auth variables and adding an “!” in front of it (not in screenshot).
Add post-login page
Lastly, let’s take advantage of the remaining Save Token Workflow by creating a post-login page we’ll later configure as the Post Login Url in Outseta.
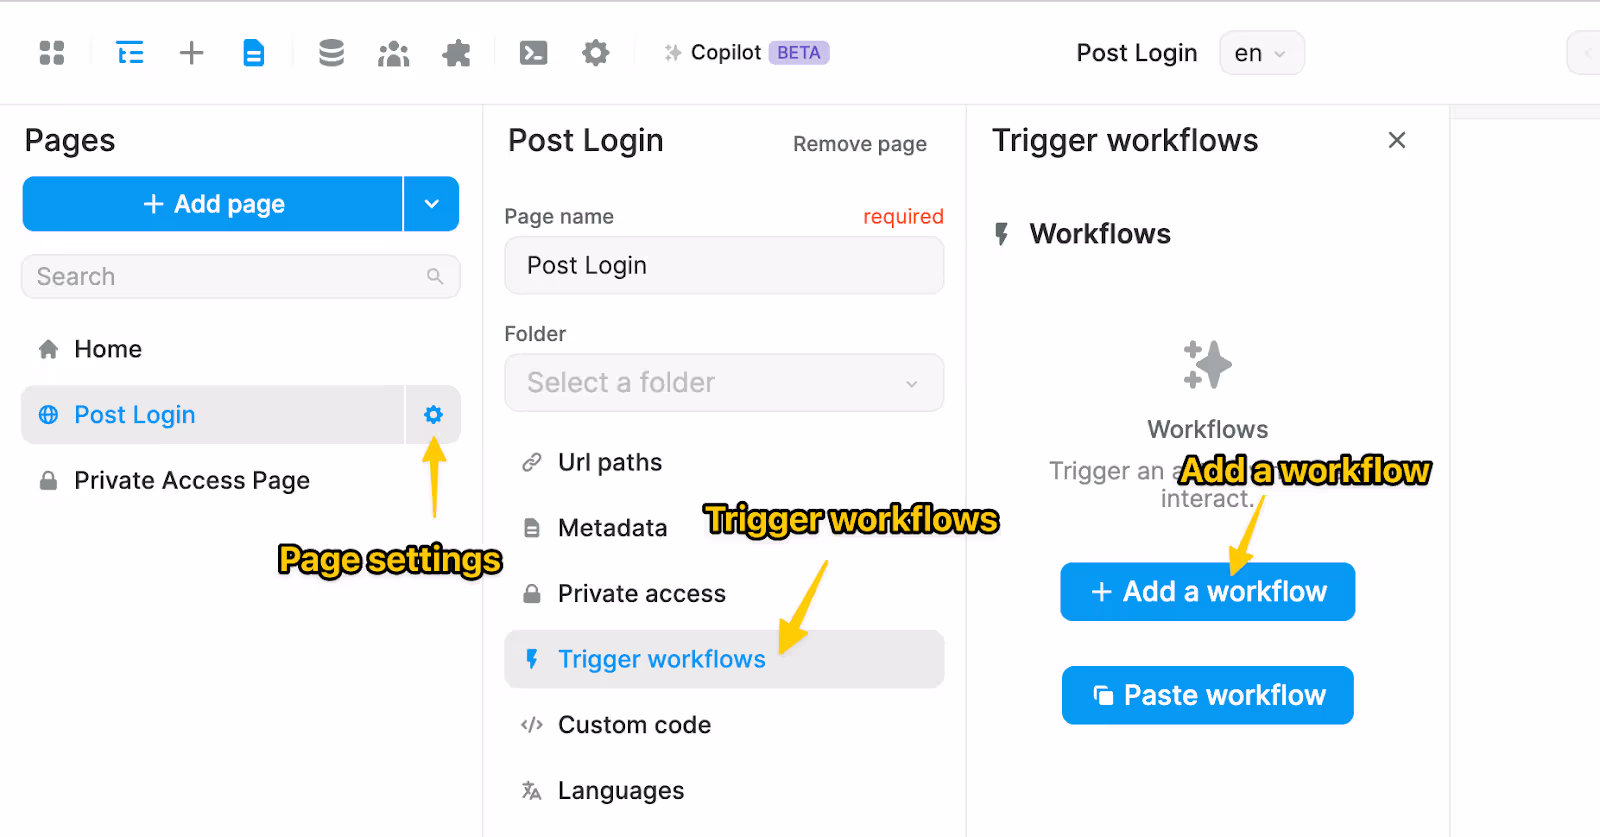
- Add a page in WeWeb and give it a name; we recommend “Post Login”
- Add a global workflow to the page: Page settings > Trigger workflows > Add a workflow
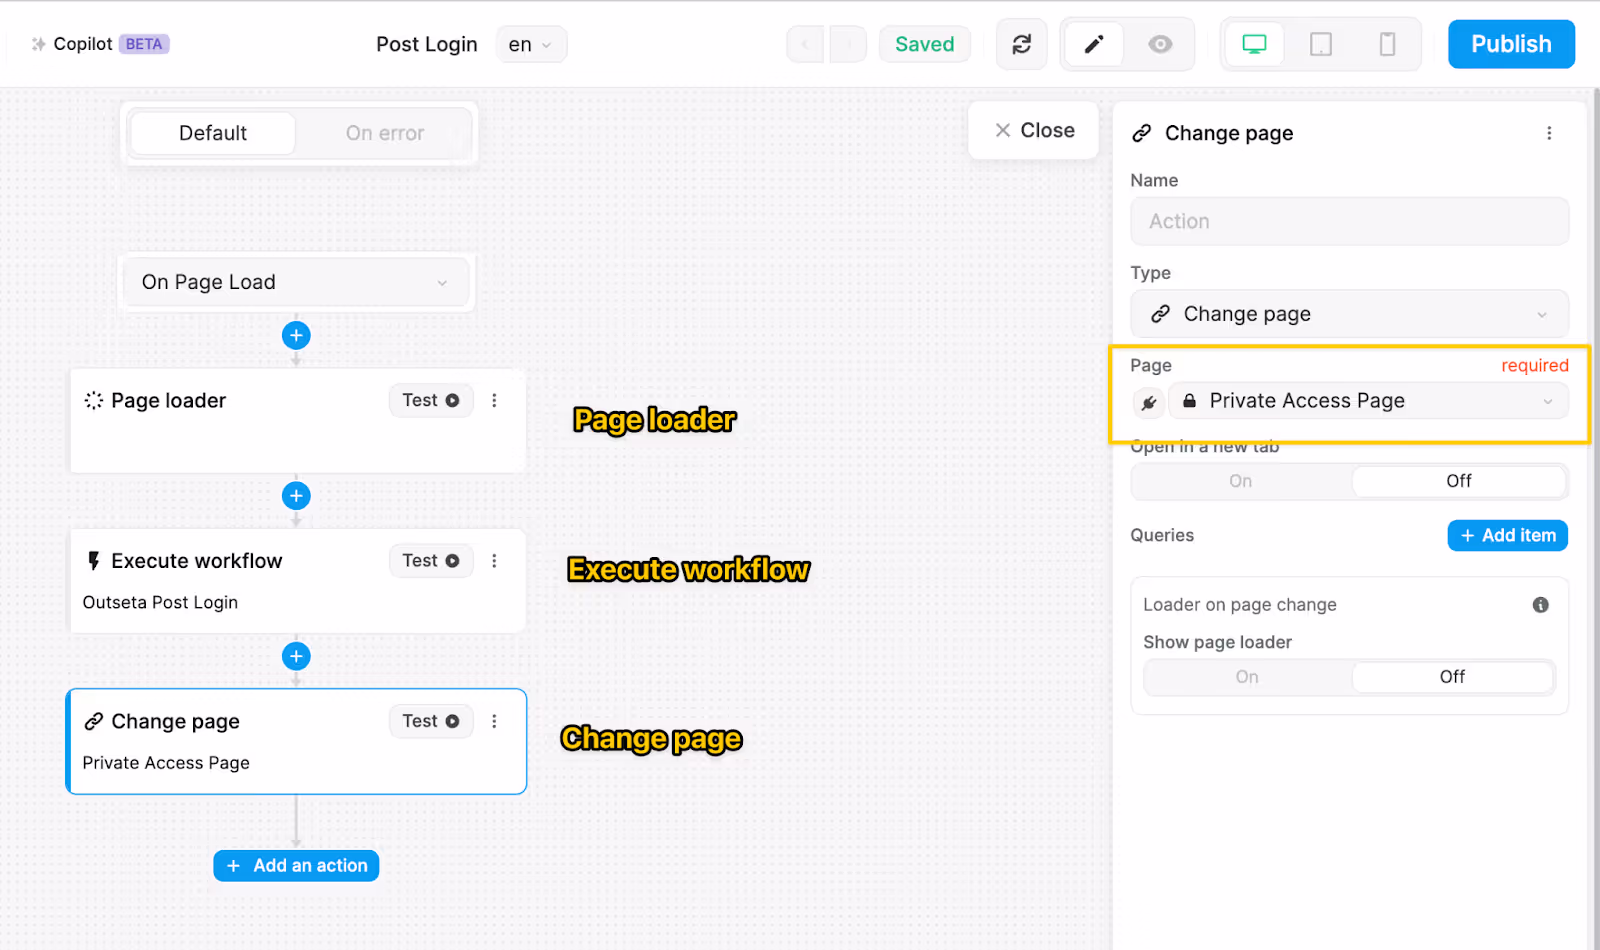
- Add the “Page loader” actions and configure: Add action > Page loader
- “Show page loader” => On
- Add the “Execute workflow” action and configure: Add action > Execute workflow
- Select the global workflow “Outseta Post Login”
- Add the “Change page” action and configure: Add action > Change page
- Configure a page to redirect to; a private access page makes sense.
Publish and test!
It’s time; let’s publish!
When you know the domain of your WeWeb site, head on over to Auth > Sign up and Login > Login Settings > Post Login URL and add the absolute URL to your post login page. Something like https://d4cbc67a-8ead-4616-a0af-dc9c942f3e6a.weweb-preview.io/post_login or https://demo.com/post_login if you have configured a custom domain in WeWeb.
If it’s not working as expected, look back through the guide, and if it does not help hit us up at support@outseta.com.
On this page